Simple PCB Repairs Keep Old Vehicle Out Of The Crusher

For those of us devoted to keeping an older vehicle on the road, the struggle is real. We know that at some point, a part will go bad and we’ll learn that it’s no longer available from the dealer or in the aftermarket, at least at a reasonable cost. We might get lucky and find a replacement at the boneyard, but if not — well, it was nice knowing ya, faithful chariot.

It doesn’t have to be that way, though, at least if the wonky part is one of the many computer modules found in most cars made in the last few decades. Sometimes they can be repaired, as with this engine control module from a Ford F350 pickup. Admittedly, [jeffescortlx] got pretty lucky with this module, which with its trio of obviously defective electrolytics practically diagnosed itself. He also had the advantage of the module’s mid-90s technology, which still relied heavily on through-hole parts, making the repair easier.

Unfortunately, his luck stopped there, as the caps had released the schmoo and corroded quite a few traces on the PCB. Complicating the repair was the conformal coating on everything, a common problem on any electronics used in rough environments. It took a bit of probing and poking to locate all the open traces, which included a mystery trace far away from any of the leaky caps. Magnet wire was used to repair the damaged traces, the caps were replaced with new ones, and everything got a fresh coat of brush-on conformal coating.

Simple though they may be, we really enjoy these successful vehicle module repairs because they give us hope that when the day eventually comes, we’ll stand a chance of being able to perform some repair heroics. And it’s nice to know that something as simple as fixing a dead dashboard cluster can keep a car out of the crusher.

Continue reading “Simple PCB Repairs Keep Old Vehicle Out Of The Crusher”

Vacuum Forming With 3D Printer Filament

Even if they don’t have one themselves, we’d wager the average Hackaday reader is at least vaguely aware of how a vacuum former works on a fundamental level. You heat up a plastic sheet until it’s soft, then use a vacuum pump to pull the ductile material down onto an object and hold it there while it cools off. It’s easy to build a vacuum forming rig yourself, but small commercial units are cheap enough that it might not be worth your time. If everything goes to plan, the technique is a quick and effective way of duplicating items around the home and shop.

But we were recently tipped off to a variation of this classic technique that’s certainly worth further research. As demonstrated in a recent video, [Nathan Martinez] shows how 3D printed sheets can be used in place of the 5″ x 5″ squares of thermoplastic film that his imported vacuum former was designed to use. It’s easy enough to do: just model up a square with the appropriate 2D dimensions in your CAD package of choice, and extrude it to a height of about .5 mm.

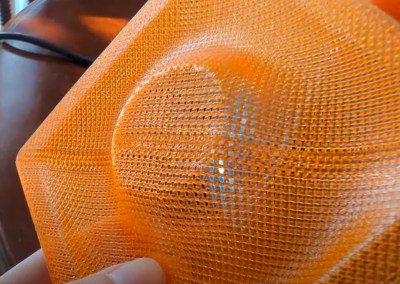
A printed mesh pattern could be used to form custom shaped filters or strainers.

So what’s the advantage? Well for one thing, it’s cheaper. Though admittedly, not by much. Going rate on Amazon seems to be about 90 cents per sheet for the real stuff, and some back of the envelope math shows the printed version coming in at around 30 cents given nominal filament costs. Whether or not those savings are worth the extra effort is certainly debatable.

But that’s not really the most interesting part. With printed sheets loaded into the vacuum former, you’ve got access to a much wider array of materials to work with. For example, [Nathan] shows off some very interesting flexible pieces he was able to produce using sheets of TPU. You can also experiment with different surface textures. These can not only be used to give your vacuum formed pieces a bit of interesting visual flair, but could actually have some practical applications. In the video we see how a printed mesh could be formed over a piece to create a conformal air vent or filter.

To be sure, there’s some room for improvement here. Not all the pulls were successes, and [Nathan] says getting the printed sheets up to the proper temperature can be tricky. But when it works, it works quite well, and we think there could be some untapped potential in this unexpected melding of new and old methods of at-home plastic production.

Continue reading “Vacuum Forming With 3D Printer Filament”

Exploring Options For DIY Waterproofing

TL;DR — Don’t use silicone to pot electronics.

That’s the conclusion [GreatScott!] comes to after trying out several methods for waterproofing electronics. His efforts stem from a recent video in which he discovered that water and electricity sometimes actually do mix, as long as the water is distilled and the electronics in the drink are relatively simple. He found that the main problem was, unsurprisingly, electrolytic corrosion, so he set out to experiment with various waterproofing coatings. In a series of careful experiments he goes through the pros and cons of both conformal coatings and potting compounds. The conformal tests used simple clear nail polish on an ESC board; that worked pretty well, but it was a little hard to reach all the nooks and crannies. He also tried potting with a thick black silicone compound, but that ended up never really curing in the middle. A final attempt with legitimate two-part epoxy potting compound sealed up the ESC tight, although we doubt the resulting brick would perform well on a quadcopter.

If you want to explore potting a bit further, check out this introduction to the basics.

Continue reading “Exploring Options For DIY Waterproofing”