Copper Bling Keeps Camera Chill

Every action camera these days seems prone to overheating and sudden shutdowns after mere minutes of continuous operation. It can be a real pain, especially when the only heat problem a photographer might face back in the day was fogged film from storing a camera in a hot car. Then again, the things a digital camera can do while it’s not overheated are pretty amazing compared to analog cameras. Win some, lose some, right?

Maybe not. [Zachary Tong], having recently acquired an Insta360 digital camera, went to extremes to solve its overheating problem with this slick external heat sink project. The camera sports two image sensor assemblies back-to-back with fisheye lenses, allowing it to capture 360° images, but at the cost of rapidly overheating. [Zach]’s teardown revealed a pretty sophisticated thermal design that at least attempts to deal with the excess heat, including an aluminum heat spreader built into the case, which would be the target of the mod.
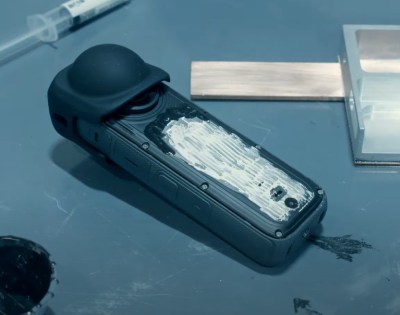
He attached a custom copper heatsink to a section of the heat spreader, which had been carefully milled flat to provide the best thermal contact. [Zach] used a fancy boron nitride heat transfer paste and attached the heat sink to the spreader with epoxy. A separate aluminum enclosure was bonded to the copper heat sink, giving [Zach] a place to mount his audio sync and timecode recorder and providing extra thermal mass.

Does it help? It sure seems to; where [Zach] was previously getting about twenty minutes before thermal shutdown with both cameras running, the heatsink-adorned rig was able to run about six times longer, with the battery giving out first. True, the heatsink takes away from the original sleek lines of the camera and might make it tough to use while snowboarding or surfing, but it’s still more portable than some external camera heatsinks we’ve seen. And besides, the copper is pretty gorgeous. Continue reading “Copper Bling Keeps Camera Chill”

Machining Copper From Algaecide

We love it when we find someone on the Internet who has the exact same problem we do and then solves it. [Hyperspace Pirate] starts a recent video by saying, “Oh no! I need to get rid of the algae in my pond, but I bought too much algaecide. If only there were a way to turn all this excess into CNC machined parts.” OK, we’ll admit that we don’t actually have this problem, but maybe you do?

Algaecide is typically made with copper sulfate. There are several ways to extract the copper, and while it is a little more expensive than buying copper, it is cost-competitive. Electrolysis works, but it takes a lot of power and time. Instead, he puts a more reactive metal in the liquid to generate a different sulfate, and the copper should precipitate out.

Continue reading “Machining Copper From Algaecide”

Magnesium And Copper Makes An Emergency Flashlight

Many of us store a flashlight around the house for use in emergency situations. Usually, regular alkaline batteries are fine for this task, as they’ll last a good few years, and you remember to swap them out from time to time. Alternatively, you can make one that lasts virtually indefinitely in storage, and uses some simple chemistry, as [JGJMatt] demonstrates.

The flashlight uses 3D printing to create a custom battery using magnesium and copper as the anode and cathode respectively. Copper tape is wound around a rectangular part to create several cathode plates, while magnesium ribbon is affixed to create the anodes. Cotton wool is then stuffed into the 3D-printed battery housing to serve as a storage medium for the electrolyte—in this case, plain tap water.

The custom battery is paired with a simple LED flashlight circuit in its own 3D-printed housing. The idea is that when a blackout strikes, you can assemble the LED flashlight with your custom battery, and then soak it in water. This will activate the battery, producing around 4.5 V and 20 mA to light the LED.

It’s by no means going to be a bright flashlight, and realistically, it’s probably less reliable than just keeping a a regular battery-powered example around. Particularly given the possibility of your homebrew battery corroding over the years unless it’s kept meticulously dry. But that’s not to say that water-activated batteries don’t have their applications, and anyway it’s a fun project that shows how simple batteries really are at their basic level. Consider it as a useful teaching project if you have children interested in science and electricity!

DIY Spacer Increases FDM Flow Rate For Faster, Better Printing

The host of problems to deal with when you’re feeling the need for FDM speed are many and varied, but high on the list is figuring out how to melt filament fast enough to accommodate high flow rates. Plus, the filament must be melted completely; a melty outside and a crunchy inside might be good for snacks, but not for 3D printing. Luckily, budget-minded hobbyists can build a drop-in booster to increase volumetric flow using only basic tools and materials.

[aamott]’s booster, which started life as a copper screw, is designed to replace the standard spacer in an extruder, with a bore that narrows as the filament gets closer to the nozzle to ensure that the core of the filament melts completely. Rather than a lathe, [aamott]’s main tool is a drill press, which he used to drill a 0.7 mm bore through the screw using a PCB drill bit. The hole was reamed out with a 10° CNC engraving bit, generating the required taper. After cutting off the head of the screw and cleaning up the faces, he cut radial slots into the body of the booster by threading the blade of a jeweler’s saw into the bore. The result was a bore wide enough to accept the filament on one end, narrowing to a (roughly) cross-shaped profile at the other.

Stacked up with a couple of knock-off Bondtech CHT nozzles, the effect of the booster was impressive — a 50% increase in flow rate. It’s not bad for a prototype made with simple tools, and it looks a little easier to build than [Stefan]’s take on the same idea.

Continue reading “DIY Spacer Increases FDM Flow Rate For Faster, Better Printing”

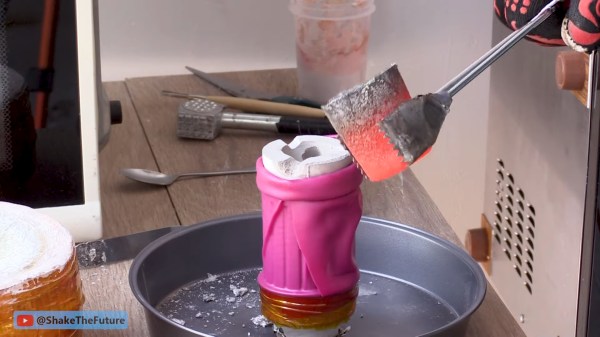
A red hot crucible is held with metal tongs above a white plaster mold. The mold is held in a bright pink silicone sleve atop a metal pan on a wooden workbench. Red cheese wax holds the sleeve to a metal funnel connected to a vacuum cleaner.

Lost Print Vacuum Casting In A Microwave

Hacks are rough around the edges by their nature, so we love it when we get updates from makers about how they’ve improved their process. [Denny] from Shake the Future has just provided an update on his microwave casting process.

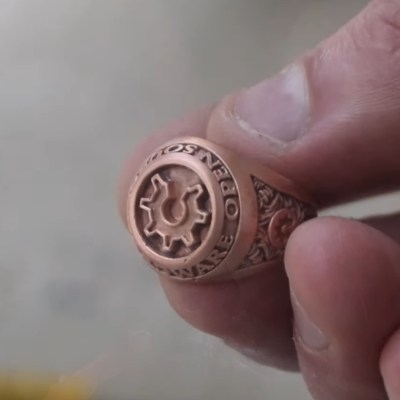
Sticking metal in a microwave certainly seems like it would be a bad idea at first, but with the right equipment it can work quite nicely to develop a compact foundry. [Denny] walks us through the process start to finish in this video, including how to build the kilns, what materials to use, and how he made several different investment castings using the process. The video might be worth watching just for all the 3D printed tools he’s built to aid in the process — it’s a great example of useful 3D prints to accompany your fleet of little plastic boats.A hand holds a very detailed copper ring. It is inscribed with the words "Open Source Hardware" and the open gear logo associated with open source hardware. It looks kinda like a class ring.

A lot of the magic happens with a one minute on and six minutes off cycle set by a simple plug timer. This allows a more gradual ramp to burn out the PLA or resin than running the microwave at full blast which can cause some issues with the kiln, although nothing catastrophic as demonstrated. Vacuum is applied to the mold with a silicone sleeve cut from a swimming cap while pouring the molten metal into the mold to draw the metal into the cavities and reduce imperfections.

We appreciate the shout out to respirators while casting or cutting the ceramic fiber mat. Given boric acid’s effects, [PDF] you might want to use safety equipment when handling it as well or just use water as that seems like a valid option.

If you want to see where he started check out this earlier version of the microwave kiln and how he used it to make an aluminum pencil.

Continue reading “Lost Print Vacuum Casting In A Microwave”

Homebrew TEM Cell Lets You EMC Test Your Own Devices

Submitting a new device for electromagnetic compatibility (EMC) testing seems a little like showing up for the final exam after skipping all the lectures. You might get lucky and pass, but it really would have been smarter to take a few of the quizzes to see how things were going during the semester. Similarly, it would be nice to know you’re not making any boneheaded mistakes early in the design process, which is what this DIY TEM cell is all about.

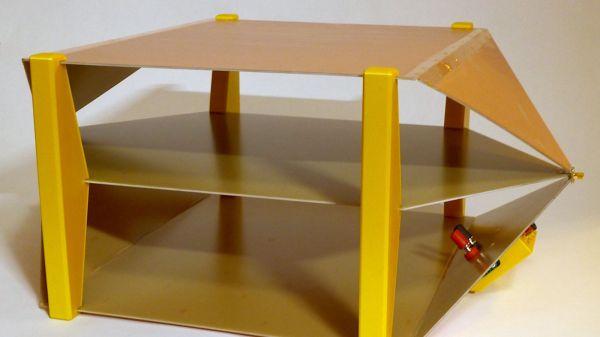
We really like [Petteri Aimonen]’s explanation of what a TEM cell, or transverse electromagnetic cell, is: he describes it as “an expanded coaxial cable that is wide enough to put your device inside of.” It basically a cage made of conductive material that encloses a space for the device under test, along with a stripline going down its center. The outer cage is attached to the outer braid of a coaxial cable, while the stripline is connected to the center conductor. Any electric or magnetic field generated by the device inside the cage goes down the coax into your test instrument, typically a spectrum analyzer.

[Petteri]’s homebrew TEM is made from a common enough material: copper-clad FR4. You could use double-sided material, or even sheet copper if you’re rich, but PCB stock is easy to work with and gets the job done. His design is detailed in a second post, which goes through the process of designing the size and shapes of all the parts as well as CNC milling the sheets of material. [Petteri] tried to make the joints by milling part-way through the substrate and bending the sheet into shape, but sadly, the copper didn’t want to cooperate with his PCB origami. Luckily, copper foil tape and a little solder heal all wounds. He also incorporated a line impedance stabilization network (LISN) into the build to provide a consistent 50-ohm characteristic impedance.

How does it work? Pretty well, it seems; when connected to a TinySA spectrum analyzer, [Petteri] was able to find high-frequency conductive noise coming from the flyback section of a switch-mode power supply. All it took was a ferrite bead and cap to fix it early in the prototyping phase of the project. Sounds like a win to us.

William Blake Was Etching Copper In 1790

You may know William Blake as a poet, or even as #38 in the BBC’s 2002 poll of the 100 Greatest Britons. But did you know that Blake was also an artist and print maker who made illuminated (flourished) books?

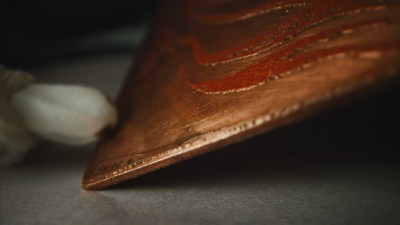
Blake sought to marry his art with his poetry and unleash it on the world. To do so, he created an innovative printing process, which is recreated by [Michael Phillips] in the video after the break. Much like etching a PCB, Blake started with a copper sheet, writing and drawing his works backwards with stopping varnish, an acid-resistant varnish that sticks around after a nitric acid bath. The result was a raised design that could then be used for printing.

Cleaning up the ink smudges before printing.

Blake was a master of color, using few pigments plus linseed or nut oil to create pastes of many different hues. Rather than use a brayer, Blake dabbed ink gently around the plate, careful not to splash ink or get any in the etched-away areas. As this was bound to happen anyway, Blake would then spend more time wiping out the etched areas than he did applying the ink.

Another of Blake’s innovations was the printing process itself. Whereas traditionally, illuminated texts must be printed in two different workshops, one for the text and the other for the illustrations, Blake’s method of etching both in the same plate of copper made it possible to print using his giant handmade press.

Want to avoid censorship and print your own ‘zines? Why not build a proofing press?.

Continue reading “William Blake Was Etching Copper In 1790”