An SAO For Hams

Generally speaking, the Hackaday Supercon badge will always have a place for SAO (rebranded as “Supercon add-ons”), and that makes sense. We did originate them, after all. This year, though, we’ve gone all in on SAO, and, in particular, we’ve asked to see more SAOs with communication capabilities. The standard has always had an I2C bus, but few people use them. I decided I wanted to set an example and cook up a badge for Supercon. Was it hard? Yes and no. I’ll share with you a little about the board’s genesis and the issues I found. At the end, I’ll make you a special offer, if you are going to Supercon.

The Idea
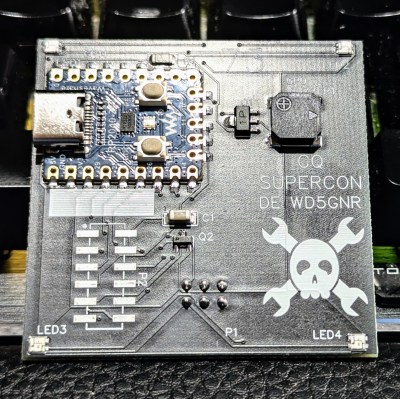
The front of the SAOGNR — the SAO connector is, of course, on the back

I’ve been a ham radio operator for a very long time. In fact, July was my 47th anniversary in the radio hobby. Well, that’s not true. It was my 47th year with a license. I had been listening to shortwave long before then. So, I wanted to do something with Morse code. You don’t have to know Morse code to get a license these days, but a lot of hams enjoy it.

I set out to do a simple board that would play some Morse code messages. But that’s just another blinking light LED with a buzzer on it, too. So, naturally, I decided it would also provide Morse code output for the I2C host. That is, the SAO could be used to convert ASCII to Morse code. Sounds simple, right? Sure.

Getting Started

I wanted to use a Raspberry Pi Pico but didn’t want to violate the SAO size requirements. Luckily, there’s an RP2040-Zero module that is quite tiny and looks more or less like a normal Pico. The two big differences are plusses: they have a reset button, and instead of a normal LED, they have a WS2812b-style LED.

Continue reading “An SAO For Hams”

Easily Program RP2040 Boards With Your Android Device

You could write your microcontroller code on your desktop PC, or you could do it on your laptop on the go. Or, if you want to get really portable about things, you could write your embedded code on your phone. Enter DroidScript.

Basically, DroidScript is a JavaScript and Python IDE for Android phones and tablets. Simple enough. You can use it to write apps for your phone or tablet. But its party piece? You can now also use it to program for embedded devices—namely, a range of those based on the RP2040 microcontroller. For example, the Adafruit QT-Py RP2040, the Pimoroni TinyFX, or the Pimoroni Yukon. They run MicroPython and CircuitPython, and you can program them from DroidScript. Easy.

A decade ago, this would have been a royal pain in the butt. But today? It’s easy, because the smartphones and devboards both use USB-C connectors. All you need is a regular USB-C cable and you can hook straight up to the board and burn your code.

You can get the app on the Google Play Store if you’re so inclined. We’ve seen some other neat smartphone programming projects over the years, too. Meanwhile, if you’ve found any other nifty ways to get your code on to a dev board, don’t hesitate to let us know!

Supercon 2023 – Going Into Deep Logic Waters With The Pico’s PIO And The Pi’s SMI

The Raspberry Pi has been around for over a decade now in various forms, and we’ve become plenty familiar with the Pi Pico in the last three years as well. Still, these devices have a great deal of potential if you know where to look. If you wade beyond the official datasheets, you might even find more than you expected.

Kumar is presently a software engineer with Google, having previously worked for Analog Devices earlier in his career. But more than that, Kumar has been doing a deep dive into maxing out the capabilities of the Raspberry Pi and the Pi Pico, and shared some great findings in an excellent talk at the 2023 Hackaday Supercon.

Continue reading “Supercon 2023 – Going Into Deep Logic Waters With The Pico’s PIO And The Pi’s SMI”

Switch Your RP2040 Between 3.3 V And 1.8 V

Ever want to build a RP2040 devboard that has everything you could ever want? Bad news,  “everything” also means adding 1.8 V GPIO voltage support. The good news is that this write-up by [xenia] explains the process of adding a “3.3 V/1.8 V” slide switch onto your board.

Some parts are obvious, like the need to pick a flash chip that works at either voltage, for instance. Unfortunately, most of them don’t. But there’s more you’d be surprised by, like the crystal, a block where the recommended passives are tuned for 3.3 V, and you need to re-calculate them when it comes to 1.8 V operation – not great for swapping between voltages with a flick of a switch. Then, you need to adjust the bootloader to detect the voltage supplied — that’s where the fun begins, in large part. Modifying the second stage bootloader to support the flash chip being used proved to be quite a hassle, but we’re graced with a working implementation in the end.

All the details and insights laid out meticulously and to the point, well-deserved criticism of Raspberry Pi silicon and mask ROM design choices, code fully in Rust, and a success story in the end – [xenia]’s write-up has all you could wish for.

Want to learn more about the RP2040’s bootloader specifically? Then check this out — straight out of Cornell, a bootloader that’s also a self-spreading worm. Not only is it perfect for updating your entire RP2040 flock, but it also teaches you everything you could want to know about RP2040’s self-bringup process.

Microsoft Sculpt Keyboard Lives Again With RP2040

Hackaday readers are likely the kind of folks that have a favorite keyboard, so you can probably imagine how devastating it would be to find out that the board you’ve sworn by for years is going out of production. Even worse, the board has some internal gremlins that show up after a few years of use, so functional ones in the second-hand market are becoming increasingly rare. So what do you do?

This is the position [TechBeret] recently found himself in with his beloved Sculpt keyboard. When Microsoft decided to step back from the peripheral market last year, he started looking at alternatives. Finding none of them appealing, he decided instead to breathe new life into the ergonomic keyboard with the RP2040. Every aspect of the resurrection is covered in a phenomenally detailed write-up on his blog, making this a valuable case study in modernizing peripherals with the popular microcontroller.

Continue reading “Microsoft Sculpt Keyboard Lives Again With RP2040”

Get More Freedom With This Guitar Pedal

When the electric guitar was first produced in the 1930s, there was some skepticism among musicians as to whether or not this instrument would have lasting impact or be a flash-in-the-pan novelty. Since this was more than a decade before the invention of the transistor, it would have been hard then to imagine the possibilities that a musician nowadays would have with modern technology to shape the sound of an instrument like this. People are still innovating in this space as well as new technology appears, like [Gary Rigg] who has added a few extra degrees of freedom to a guitar effects pedal.

A traditional expression pedal, like a wah-wah pedal, uses a single motion to change an aspect of the sound of the guitar, and is generally controlled with the musician’s foot. [Gary]’s pedal, on the other hand, can be manipulated in three different ways to control separate elements of the instrument’s sound. It can be pitched forward and back like a normal effects pedal, but also rolled side-to-side and twisted around its yaw axis. The pedal has a built-in IMU to measure the various position changes of the pedal, which is then translated by an RP2040 microcontroller to a MIDI signal which controls the three different aspects of the sound digitally.

While the yaw motion might be difficult for a guitarist to create with their foot while playing, the idea for this pedal is still excellent. Adding in a few more degrees of freedom gives the musician more immediate control over the sound of their instrument and opens up ways of playing that might not be possible or easy with multiple pedals, with the MIDI allowing for versatility that might not be available in many analog effects pedals. Not every pedal needs MIDI though; with the help of a Teensy this digital guitar pedal has all its effects built into a self-contained package.

Continue reading “Get More Freedom With This Guitar Pedal”

Three different views of a tiny games console with a screen and a single button. It's assembled in the first picture, and the guts are shown in the second two pictures.

2024 Tiny Games Contest: Salsa One Handheld Requires No PCB

If you’re thinking about building a single tiny game or even a platform, you might be tempted to use a single button for everything. Such is the case with [Alex]’s Salsa ONE minimalist game console, which is inspired by both the Arduboy and the ergonomics of the SanDisk Sansa music player.

With Salsa ONE, [Alex] aimed to make something that is both simple and challenging. The result is something that, awesomely enough, doesn’t need a PCB, and can be comfortably controlled with just one thumb. There isn’t much to this thing, which is essentially an RP2040, an OLED, a vibration motor, a buzzer, a button, and a CR2032 coin cell. [Alex] chose to program Salsa ONE in MicroPython. Be sure to check it out in action in the brief demo after the break.

Have you got an idea for a tiny game? Don’t hesitate to enter the 2024 Tiny Games Contest! You have until September 10th, so head on over to Hackaday.io and get started today.

Continue reading “2024 Tiny Games Contest: Salsa One Handheld Requires No PCB”