RF Detector Chip Helps Find Hidden Cameras And Bugs

It’s a staple of spy thriller movies, that the protagonist has some kind of electronic scanner with which he theatrically searches his hotel room to reveal the bad guys’ attempt to bug him. The bug of course always had a flashing LED to make it really obvious to viewers, and the scanner was made by the props department to look all cool and futuristic.

It’s not so far-fetched though, while bugs and hidden cameras in for example an Airbnb may not have flashing LEDs, they still emit RF and can be detected with a signal strength meter. That’s the premise behind [RamboRogers]’ RF hunter, the spy movie electronic scanner made real.

At the rear of the device is an ESP32, but the front end is an AD8317 RF detector chip. This is an interesting and useful component, in that it contains a logarithmic amplifier such that it produces a voltage proportional to the RF input in decibels. You’ll find it at the heart of an RF power meter, but it’s also perfect for a precision field strength meter like this one. That movie spy would have a much higher chance of finding the bug with one of these.

For the real spies of course, the instruments are much more sophisticated.

A 3D Printed, Open Source Lathe?

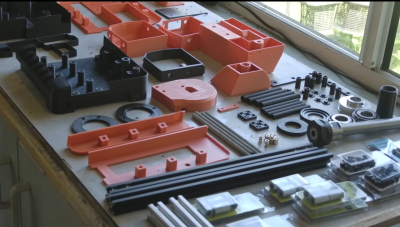
[Chris Borge] has spent the last few years creating some interesting 3D printed tools and recently has updated their 3D printable lathe design to make a few improvements. The idea was to 3D print the outer casing of the lathe in two parts, adding structural parts where needed to bolt on motors and tool holders, and then fill the whole thing with concrete for strength and rigidity.

Only a few parts to print

The printed base is initially held together with two lengths of studding, and a pile of bolts are passed through from below, mating with t-nuts on the top. 2020 extrusion is used for the motor mount. The headstock is held on with four thread rods inserted into coupling nuts in the base. The headstock unit is assembled separately, but similarly; 3D printed outer shell and long lengths of studding and bolts to hold it together. Decent-sized tapered roller bearings make an appearance, as some areas of a machine tool really cannot be skrimped. [Chris] explains that the headstock is separate because this part is most likely to fail, so it is removable, allowing it to be replaced.

Continue reading “A 3D Printed, Open Source Lathe?”

Forget Flipper, How About Capybara?

One of the hacker toys to own over the last year has been the Flipper Zero, a universal wireless hacking tool which even caused a misplaced moral panic about car theft in Canada. A Flipper is cool as heck of course but not the cheapest of devices. Fortunately there’s now an alternative in the form of the CapibaraZero. It’s a poor-hacker’s Flipper Zero which you can assemble yourself from a heap of inexpensive modules.

At the center is an ESP32-S3 board, which brings with it that chip’s wireless and Bluetooth capabilities. To that is added an ST7789 TFT display, a PN532 NFC reader, an SX1276 LoRa and multi-mode RF module, and an IR module. The firmware can be found through GitHub. Since the repo is nearly two years old and still in active development, we’re hopeful CapibaraZero will gain features and stability.

If you’re interested in our coverage of the Canadian Flipper panic you can read it here, and meanwhile if you’re using one of those NFC modules, consider tuning it.

A large silver cone attached to a black hemisphere floats over a piece of sheet metal held in a metal frame. The metal has what appears to be machine grease on it to aid in the forming process.

CNC Metal Forming

Forming complex shapes in metal sheets is still a laborious process, especially if you aren’t needing more than a couple parts so stamping doesn’t make sense. That may change with Digital Sheet Forming.

While this video is basically an ad for one vendor’s approach, it gives a good set of examples of what the technique can achieve. The high pressure mechanism of the machine presses the metal layer by layer down against a silicone backing to form what you’ve designed, in this case, the nose cone for a Tucker Carioca.

Some people will decry it killing the metal forming industry, but as [Rob Ida] says in the video, it will allow metal formers to become more efficient at the work they do by taking out the tedium and letting them focus on the parts of the process requiring the most skill. Anyone who’s done any work with a 3D printer or CNC mill will know that sending a file to a machine is only one small part of the process.

We’re anxious to see this technology make its way to the makerspace and home shop. If you want to do some sheet metal forming now, why not try hydroforming?

Continue reading “CNC Metal Forming”

The FNIRSI HRM-10 Internal Resistance Meter

Occasionally, we find fun new electronic instruments in the wild and can’t resist sharing them with our readers. The item in question is the FNIRSI HRM-10 Internal resistance meter, which we show here being reviewed by [JohnAudioTech].

So what does it do, and why would you want one? The device is designed to measure batteries so you can quickly determine their health. Its operating principle also allows it to do a decent job of measuring low-resistance parts, which is not necessarily as easy to achieve with the garden variety multimeter, especially the low-end ones. We reckon it would be useful in the field for checking the resistance of switches and relays, possibly in automotive or industrial applications. The four-pin connector is needed because there are two wires per probe, making a Kelvin (also known as four-wire) connection.

Likely, the operating principle is to apply a varying load to the battery under test and then measure the voltage drop. The slope of the voltage sag vs load is a reasonable estimate of the resistance of the source, at least for the applied voltage range. The Kelvin connection uses one pair of wires to apply the test current from a relatively low-impedance source and the second pair to measure the voltage with a high input impedance. That way, the resistance of the probe wires can be calibrated out, giving a much more accurate measurement. Many lab-grade measurement equipment works this way.

Circling back to the HRM-10, [John] notes that it also supports limit testing, making it a helpful gauging tool for the workbench when sorting through many batteries. Data logging and the ability to upload to a computer completes the feature set, which is quite typical for this level of product now. Gone are the days of keeping a manual logbook next to the instrument stack and writing everything down by hand!

We’ve touched on measuring battery internal resistance before, but it was a while ago. Regarding Kelvin connections, here’s a quick guide and a hack upgrading a cheap LCR to support 4-wire probes.

Continue reading “The FNIRSI HRM-10 Internal Resistance Meter”

Solve: An ESP32-Based Equation Solving Calculator

We’re suckers for good-looking old-school calculators, so this interesting numerical equation-solving calculator by [Peter Balch] caught our attention. Based around the ESP32-WROOM-32 module and an LCD, the build is quite straightforward from an electronics point of view, with the main work being on the software side of things.

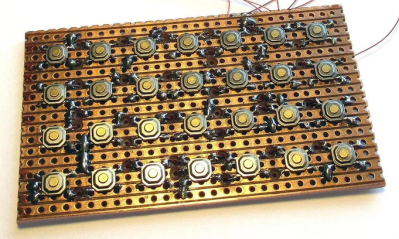
A custom keyboard was constructed on Veroboard using a handful of tactile switches arranged in a charlieplexing array to minimize the number of IO pins consumed. For the display, an off-the-shelf 240×320 ILI9341-based module hooked up by SPI was used. A single lithium cell was used for the power supply, connected to a USB

You don’t need much to make a usable keyboard.

charger module, but you could just as easily substitute a 3 x AA battery box. The case was designed in DesignSpark mechanical and 3D printed. It’s unclear what keyboard version they settled on; there are options for one with keycaps and one without. Regardless, a 3D-printed frame sits atop the keyboard circuit, with the graphics printed on photo paper and a protective coversheet on top. Continue reading “Solve: An ESP32-Based Equation Solving Calculator”

A Power Supply With Ultra High Resolution Current Measurement Built In

Need to do some real fine power consumption measurements? [Gero Müller] was in that exact situation, and wasn’t happy with the expensive off-the-shelf tools for doing the job. Thus, he built his own. Meet nanoTracer.

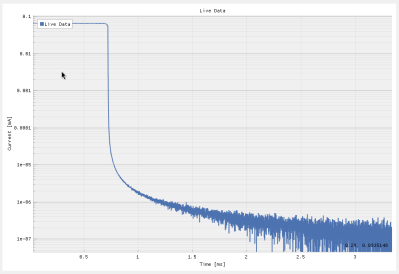
nanoTracer measures small current draws in very high resolution.

The concept of the device is simple. It’s a power supply that measures current on a nanoampere scale, and on microsecond intervals. It can deliver from 0 to 5.125 volts in 256 steps, and up to 100 mA of current. It has a sampling bandwidth of 1 MHz, at 2 million samples per second, with effective dynamic range from 100 mA all the way down to 100 nA. For capturing microscopic changes in current draw, that’s invaluable. The device also features a UART for talking to an attached project directly, and additional pins for taking further ADC measurements where needed.

Right now, it’s at an early prototype stage, and [Gero] tells us the software is “very basic” right now. Still, it’s easy to see how this device would be very useful to anyone working to optimize power consumption on low-power projects. One wonders if there are some applications in power-based side-channel attacks, too.

We’re hoping to learn more about nanoTracer from [Gero] soon—how it was built, how it works, and what it’s really like to use. Perhaps one day down the line, the design might even become available for others that could use such a nifty tool. There’s no mucking about when you get down to nanoamps, after all. If you’ve cooked up something similar in your own lab, don’t hesitate to let us know!