A screen capture from Portal 2 running in Asahi Linux. The Asahi Linux logo is in the bottom right of the image as a watermark. The environment is a concrete and glass building with elements of nature taking over the room on the other side of the glass from the character. A red circle with a grey cube above it is in the foreground.

Asahi Linux Brings Better Gaming To Apple Silicon

For those of you longing for better gaming on an Apple Silicon device, Asahi Linux is here to help.

While Apple’s own line of CPUs are relatively new kids on the block, they’ve still been around for four years now, giving hackers ample time to dissect their innards. The team behind Asahi Linux has now brought us “the only conformant OpenGL®, OpenCL™, and Vulkan® drivers” for Apple’s M1 and M2.

The emulation overhead of the system means that most games will need at least 16 GB of RAM to run. Many games are playable, but newer titles can’t yet hit 60 frames per second. The developers are currently focused on “correctness” and hope to improve performance in future updates. Many indie titles are reported to already be working at full speed though.

You can hear more about some of the fiddly bits of how to “tessellate with arcane compute shaders” in the video below. Don’t worry, it’s only 40 minutes of the nine hour video and it should start right at the presentation by GPU dev [Alyssa Rosenzweig].

If you want to see some of how Linux on Apple Silicon started or some of the previous work on hacking the M1 GPU, we have you covered.

Continue reading “Asahi Linux Brings Better Gaming To Apple Silicon”

A stack of Activation Locked MacBooks destined for the shredder in refurbisher [John Bumstead]’s workshop.

Apple IOS 18’s New Repair Assistant: Easier Parts Pairing Yet With Many Limitations

Over the years, Apple has gone all-in on parts pairing. Virtually every component in an iPhone and iPad has a unique ID that’s kept in a big database over at Apple, which limits replacement parts to only those which have their pairing with the host system officially sanctified by Apple. With iOS 18 there seems to be somewhat of a change in how difficult getting a pairing approved, in the form of Apple’s new Repair Assistant. According to early responses by [iFixit] and in a video by [Hugh Jeffreys] the experience is ‘promising but flawed’.

As noted in the official Apple support page, the Repair Assistant is limited to the iPhone 15+, iPad Pro (M4) and iPad Air (M2), which still leaves many devices unable to make use of this feature. For the lucky few, however, this theoretically means that you can forego having to contact Apple directly to approve new parts. Instead the assistant will boot into its own environment, perform the pairing and calibration and allow you to go on your merry way with (theoretically) all functionality fully accessible.

Continue reading “Apple IOS 18’s New Repair Assistant: Easier Parts Pairing Yet With Many Limitations”

Access The Information Superhighway With A Mac Plus

For some time now, Apple has developed a reputation for manufacturing computers and phones that are not particularly repairable or upgradable. While this reputation is somewhat deserved, especially in recent years, it seems less true for their older machines. With the second and perhaps most influential computer, the Apple II, being so upgradable that the machine had a production run of nearly two decades. Similarly, the Macintosh Plus of 1986 was surprisingly upgradable and repairable and [Hunter] demonstrates its capabilities by bringing one onto the modern Internet, albeit with a few tricks to adapt the old hardware and software to the modern era.

The Mac Plus was salvaged from a thrift store, and the first issue to solve was that it had some rotten capacitors that had to be replaced before the computer could be reliably powered on at all. [Hunter] then got to work bringing this computer online, with the only major hardware modification being a BlueSCSI hard drive emulator which allows using an SD card instead of an original hard disk. It can also emulate an original Macintosh Ethernet card, allowing it to fairly easily get online.

The original operating system and browser don’t support modern protocols such as HTTPS or scripting languages like Javascript or CSS, so a tool called MacProxy was used to bridge this gap. It serves simplified HTML from the Internet to the Mac Plus, but [Hunter] wanted it to work even better, adding modular domain-specific handling to allow the computer to more easily access sites like Reddit, YouTube, and even Hackaday, although he does call us out a bit for not maintaining our retro page perhaps as well as it ought to be.

[Hunter] has also built an extension to use the Wayback Machine to serve websites to the Mac from a specific date in the past, which really enhances the retro feel of using a computer like this to access the Internet. Of course, if you don’t have original Macintosh hardware but still want to have the same experience of the early Internet or retro hardware this replica Mac will get you there too.

Continue reading “Access The Information Superhighway With A Mac Plus”

Two hands hold a rounded rectangular case with a small lollipop-shaped cutout. The case is dark grey with a bit of white protruding between the two halves in the middle.

Add USB-C To Your AirPods The Easy Way

While the death of Apple’s Lightning Connector can’t come soon enough, swapping the ports on their products as “category-defining innovations” seems a bit of a stretch. [Ken Pillonel] has designed a set of streamlined, repairable, USB-C adapters for the AirPods, AirPods Pro, and AirPods Max that show Apple what innovation really means.

If you’ve followed [Pillonel]’s work in the past, you’ll know he’s as a big a fan of repairability as we are here, so this isn’t just a cheap knockoff dongle that’ll be in the trash as fast as your counterfeit wireless earbuds. In the video below, he walks us through his quest start-to-finish to design something compact that gives you all the joys of USB-C without the pain of buying a whole new set of headphones.

We like the iteration on the connector, showing that flexible circuits can do some amazing things, but are still subject to failure at extreme angles. Using a combination of 3D printing, a cool robot sandblasting machine, a pick-and-place, and some old fashioned hand soldering, [Pillonel] treats us to a polished final product that’s put together with actual screws and not adhesive. His designs are all open source, so you can DIY, or he sells finished copies in his shop if you want to give one to your less-than-techy relatives.

[Pillonel] may seem familiar as he’s the guy who added USB-C to the iPhone before Apple and redesigned the AirPods Pro case for repairability. Apple is getting better about repair in some of its devices, for sure, but unsurprisingly, hackers do it better.

Continue reading “Add USB-C To Your AirPods The Easy Way”

Hands-on With New IPhone’s Electrically-Released Adhesive

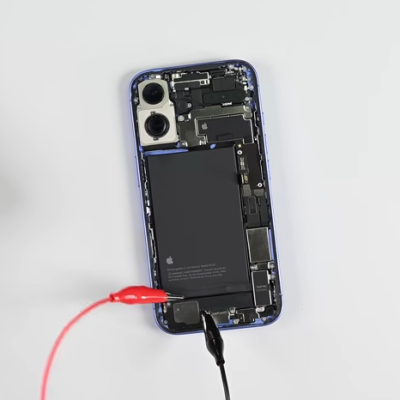
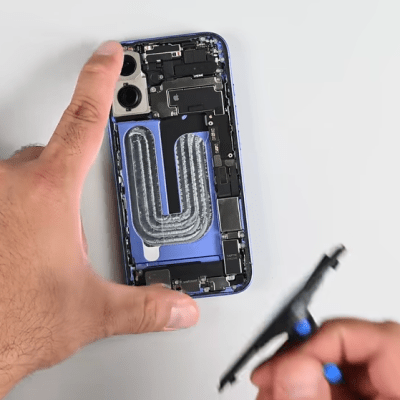
There’s a wild new feature making repair jobs easier (not to mention less messy) and iFixit covers it in their roundup of the iPhone 16’s repairability: electrically-released adhesive.

Here’s how it works. The adhesive looks like a curved strip with what appears to be a thin film of aluminum embedded into it. It’s applied much like any other adhesive strip: peel away the film, and press it between whatever two things it needs to stick. But to release it, that’s where the magic happens. One applies a voltage (a 9 V battery will do the job) between the aluminum frame of the phone and a special tab on the battery. In about a minute the battery will come away with no force, and residue-free.

There is one catch: make sure the polarity is correct! The adhesive releases because applying voltage oxidizes aluminum a small amount, causing Al3+ to migrate into the adhesive and debond it. One wants the adhesive debonded from the phone’s frame (negative) and left on the battery. Flipping the polarity will debond the adhesive the wrong way around, leaving the adhesive on the phone instead.

Some months ago we shared that Apple was likely going to go in this direction but it’s great to see some hands-on and see it in action. This adhesive does seem to match electrical debonding offered by a company called Tesa, and there’s a research paper describing it.

A video embedded below goes through the iPhone 16’s repairability innovations, but if you’d like to skip straight to the nifty new battery adhesive, that starts at the 2:36 mark.

Continue reading “Hands-on With New IPhone’s Electrically-Released Adhesive”

Rescuing High-Res Displays From Older Macs

When Apple started rolling out its Retina displays, it multiplied the amount of pixels compared to their standard, non-Retina displays by four. This increased pixel density while keeping the standard screen size — idea for those needing a lot of detail for their work. But, as is common with Apple, using these displays outside of the Apple ecosystem can be quite a challenge. Retina displays have been around for about a decade now, though, with some third-party hardware able to break them free of their cage. This post details how [Kevin] liberated the 5K display from a 2017 iMac for more general use with support for USB-C.

The first step was to find a used iMac for the right price, and then sell off most of its parts to recoup most of the initial cost. That brought the cost of the panel itself to about $250. The key to getting the display working without all of the Apple hardware is the R1811 driver board, which can be had for around $300. A new 156 watt power supply was added to the mix, and [Kevin] also put in a few extras like a USB cable extension and a latching push-button which kills the display’s power. Additionally, he attempted to get the original iMac speakers working with this setup too, but none of his attempts resulted in anything close to quality sound so he’s mostly abandoned that extra feature for now.

With that all buttoned up, he has a 27″ 5K display with USB-C input for around $650 which is quite a deal. The MacRumors thread that [Kevin] added his project to currently has around 1,700 posts about similar builds too, so it can be a wealth of information for all kinds of models. As Apple drops support for their older machines, these displays will become more and more common and projects like these can keep a lot of e-waste out of the landfill while also providing decent hardware at a bargain price. Don’t just look for iMacs and MacBooks though; there’s a similar process to use various iPad displays for other things as well.

Using The Pi Pico As ‘Programmable Hardware’ For The Apple II

When we think of programmable hardware, we think of FPGAs. But they’re not the only option. [Oliver Schmidt] has been exploring how the Raspberry Pi Pico can serve in such a role for the classic Apple II. The talk was presented at the KansasFest event this year, and it’s well worth diving into!

[Oliver] has developed A2Pico. It’s a series of Apple II peripheral cards that are based around the Raspberry Pi Pico, as you might have guessed. [Oliver] has been working in the area since 2021 with one [Glenn Jones], with the duo experimenting with connecting the versatile microcontroller directly to the slot bus of the Apple II. [Ralle Palaveev] then chimed in, developing the A2Pico hardware with solely through-hole components for ease of assembly.

A number of cards have been developed based on A2Pico, including a storage device, a Z80 CP/M card, and a specialized card to play Bad Apple on the IIGS. It’s all thanks to the versatility of the programmable I/O (PIO) peripheral inside the Raspberry Pi Pico. This device enables the Pico to be reprogrammed to handle all sorts of complicated tasks at great speed. This is particularly useful when using it to bit-bang a protocol or talk with another machine, and it serves perfectly well in this role. Basically, by reprogramming the Pico and its PIO, the A2Pico design can become any one of a number of different add-on cards.

It’s well worth diving into this stuff if you’ve ever contemplated building your own peripheral cards for 8-bit and 16-bit machines. We’ve seen some other great add-on cards for vintage machines before, too.

Continue reading “Using The Pi Pico As ‘Programmable Hardware’ For The Apple II”