A chicken's egg with many holes glows beneath a glass globe set atop an inverted wooden bowl.

Glowing Egg Is A One-Oeuf Solution For Tracking Cycles

Look, if something happened to you every three weeks or so to basically turn you into a different person and factored heavily into whether any new humans were created, you’d probably want to keep abreast of the schedule, yeah? Yeah. So, while there are, of course, a ton of ways to do this with your phone, most of those apps do gross things with your data. Are you angry yet?

A standard chicken's egg with many holes both large and small.[Jakoba the Online Witch] certainly was, or if not angry, at least annoyed. So she built a glowing egg timer, which shines a different color based on current point in her cycle, to let her know when she is fertile and expecting Aunt Flo.

The coolest part is that this is an actual egg from one of [Jakoba]’s backyard chickens. No. The coolest part is how she was able to make so many holes without breaking it. (It took four tries.)

After bleaching the insides, the egg was ready to glow. As [Jakoba] says, the guts are simple — just a Wemos D1 Mini ESP8266, a WS2812 LED, and a heatsink. The enclosure consists of an inverted peanut bowl with a glass ornament hot-glued in place.

Once it was put together, all she had to do was add it in Home Assistant and use the current calendar state to trigger services from the YAML configuration.

Would you prefer an on-body solution? Here’s an earring that tracks temperature.

An ESP Makes A Bicycle Odometer

If you’d like to measure the speed of your cycling then it’s easy enough to buy a cycle computer, but as [Clovis Fritzen] has done it’s also an option to build one. The result of his work is a smart PCB on which the speed is indicated with a row of LEDs.

The sensor is a straightforward affair, a reed switch with a magnet on a wheel, which is sensed by an ESP8266. The six LEDs are charlieplexeed over three lines. To keep the supply voltage correct for the ESP from the uncertain state of a lithium battery, a small buck-boost module is used. Sadly the code doesn’t seem to make the speed available via the wireless part of the processor, but we’re guessing that a bit of extra software work could fix that.

The result when put in a box on the handlebars, is a smart but simple instrument that would aid any bike. It’s by no means the first one we’ve brought you and we doubt it will be the last.

A Cute Sentry Scans Your Net For Scullduggery

As long as we get to make our own network security tools, why not make them look cute? Netgotchi may not be much more than an ESP8266 running network scans and offering up a honeypot service, but it smiles while sits on your desk and we think that’s swell.

Taking inspiration from a recent series of red-team devices that make hacking adorable, most obviously pwnagotchi (and arguably Flipper), Netgotchi lives on the light side of the Force. Right now, it enumerates the devices on your network and can alert you when anything sketchy joins in. We can totally imagine customizing this to include other network security or health checks, and extending the available facial expressions accordingly.

You might not always be thinking about your network, and if you’re like us, that’s probably just fine. But we love standalone displays that show one thing in an easily digestable manner, and this fits the bill, with a smile.

Photo of a Nice-Power supply

Quick & Capable WiFi For Your Nice-Power Supply

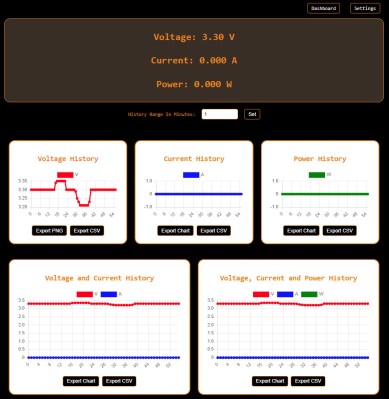
Rejoice, those of us who have purchased a Nice-Power lab PSU from an Eastern source. Yes, the name might sound like a re-brand of a generic product, maybe you will even see this exact PSU on a shelf at a physical store near you, under a more local brand name and with a fair markup. Nevermind the circumstances, the most important part is that [Georgi Dobrishinov] found a way to add an ESP8266 to the PSU by tapping its internal UART control interface, and wrote a web UI for all your Internet-of-Lab-PSUs needs, called the PowerLinkESP project.

All you need is a Wemos D1 development board, or any other ESP8266 board that has UART pins exposed and handles 5 V input. [Georgi] brings everything else, from pictures showing you where to plug it in and where to tap 5 V, to extensive instructions on how to compile and upload the code, using just the Arduino IDE. Oh, and he tops it off with STLs for a 3D printed case, lest your Wemos D1 board flop around inside.

With [Georgi]’s software, you can monitor your PSU with interactive charts for all readings, export charts in both PNG and CSV, and access a good few features. Your ESP8266’s network uplink is also highly configurable, from an STA mode for a static lab config, to an AP mode for any on-the-go monitoring from your phone, and it even switches between them automatically! The firmware makes your PSU all that more practical, to the point that if you’re about to build an interface for your PSU, you should pay attention to [Georgi]’s work.

Lab PSUs with WiFi integration are worth looking into, just check out our review of this one; smart features are so nice to have, we hackers straight up rewrite PSU firmware to get there if we have to. Oh, and if you ever feel like standardizing your work so that it can interface to a whole world of measurement equipment, look no further than SCPI, something that’s easier to add to your project than you might expect, even with as little as Python and a Pi.

An RGB LED clock that resembles a color blindness test.

RGB LED HexaClock Doesn’t Actually Light Up The Night

Who says a clock can’t be both useful and beautiful? That seems to be the big idea behind the lovely little HexaClock from [Bulduper]. And boy, is it both.

Probably the most important part of this well-illuminated clock is the light sensor, which allows it to adjust the brightness automatically. If you’re not into that, well, there’s a really nice web app that’ll let you program the dickens out of it.

The brains of this thing is an ESP8266 on a custom PCB which controls the 127 individually addressable RGB LEDs. The clock may look large, but the big printed parts just fit on the bed of a Prusa i3. [Bulduper] used ABS because the LED strip and the PCB might get a little warm; they didn’t want to risk using PLA and having it turn into a Salvador Dali clock (although that could be cool).

Speaking of heat, make sure to use 18 AWG or thicker wires as [Bulduper] advises. LEDs may be efficient, but this clock uses lots of them! If you want to build one of these to bathe your wall in useful light, everything you need is available on GitHub. Watch HexaClock do its thing in the brief demo and walk-through video after the break.

If this is a little too bright for your tastes, check out this synesthesia clock.

Continue reading “RGB LED HexaClock Doesn’t Actually Light Up The Night”

DIY DNA Lamp

DIY Electronics Plus Woodworking Equal Custom Lamp

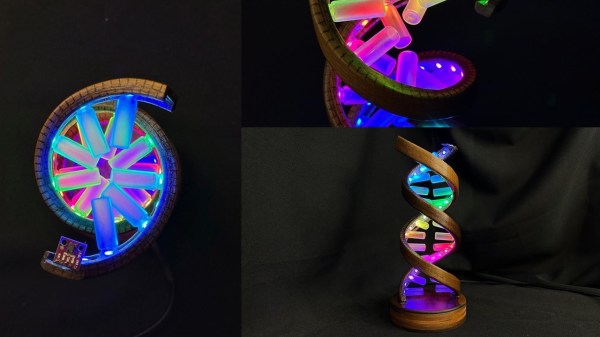
There is something about wooden crafts that when combined with electronics, have a mesmerizing effect on the visual senses. The Gesture Controlled DNA Wooden Desk Lamp by [Timber Rough] is a bit of both with a nice desk piece that’s well documented for anyone who wants to build their own.

Construction starts with a laser cutter being employed to add kerfs, such that the final strips can be bent along a frame tube to form the outer backbone of the DNA helix structure. Add to the mix some tung oil, carnauba wax, and some glue — along with skill and patience — and you get the distinct shape of sugar-phosphate backbone.

The electronics include an ESP8266 with the PAJ7620 gesture sensor that controls two WS2812B RGB LED Strips. The sensor in question is very capable, and comes with the ability to recognize nine human hand gestures along with proximity which makes it apt for this application. The sensor is mounted atop the structure with the LEDs twisting down the frame to the base where the ESP8266 is tucked away. Tiny glass bottles are painted with acrylic spray varnish and then glued to the LEDs to form the base pairs of the double helix. We thought that the varnish spray was a clever idea to make light diffusers that are quick and cheap for most DIYers.

We previously covered how this particular gesture sensor can be used to control much more than a lamp if you seek more ideas in that realm.

Continue reading “DIY Electronics Plus Woodworking Equal Custom Lamp”

Supercon 2023: Alex Lynd Explores MCUs In Infosec

The average Hackaday reader hardly needs to be reminded of the incredible potential of the modern microcontroller. While the Arduino was certainly transformative when it hit the scene, those early 8-bit MCUs were nothing compared to what’s on the market now. Multiple cores with clock speeds measured in the hundreds of megahertz, several MB of flash storage, and of course integrated WiFi capability mean today’s chips are much closer to being fully-fledged computers than their predecessors.

It’s not hard to see the impact this has had on the electronics hobby. In the early 2000s, getting your hardware project connected to the Internet was a major accomplishment that probably involved bringing some hacked home router along for the ride. But today, most would consider something like an Internet-connected remote environmental monitor to be a good starter project. Just plug in a couple I2C sensors, write a few lines of Python, and you’ve got live data pouring into a web interface that you can view on your mobile device — all for just a few bucks worth of hardware.

But just because we’re keenly aware of the benefits and capabilities of microcontrollers like the ESP32 or the Pi Pico, doesn’t mean they’ve made the same impact in other tech circles. In his talk Wireless Hacking on a $5 Budget, Alex Lynd goes over some examples of how he’s personally put these devices to work as part of his information security (infosec) research.

Continue reading “Supercon 2023: Alex Lynd Explores MCUs In Infosec”