Pi Zero Power Optimization Leaves No Stone Unturned

If you’ve ever designed a battery-powered device with a Pi Zero, you have no doubt looked into decreasing its power consumption. Generic advice, like disabling the HDMI interface and the onboard LED, is omnipresent, but [Manawyrm] from [Kittenlabs] goes beyond the surface-level, and gifts us an extensive write-up where every recommendation is backed with measurements. Armed with the Nordic Power Profiler kit and an SD card mux for quick experimentation, she aimed at two factors, boot time and power consumed while booting, and made sure to get all the debug information we could use.

Thanks to fast experimentation cycles and immediate feedback, we learn plenty of new things about what a Pi Zero does and when, and how we can tame various power-hungry aspects of its behavior. Disabling the GPU or its aspects like HDMI output, tweaking features like HAT and other peripheral probing, and even tactical overclocking during boot – it’s an extensive look at what makes a Pi Zero tick, and no chance for spreading baseless advice or myths.

All in all, this write-up helps you decrease the boot time from twelve seconds to just three seconds, and slash the power budget of the boot process by 80%. Some recommendations are as simple as config.txt entries, while others require you to recompile the kernel. No matter the amount of effort you can put into power optimization, you’ll certainly find things worth learning while following along, and [Manawyrm]’s effort in building her solar-powered Pi setup will help us all build better Pi-Zero-powered solar devices and handhelds.

Retro Inspired Cyberdeck Scrolls Around Cyberspace

It’s difficult to nail down exactly what counts as a “real” cyberdeck in this brave new era of bespoke computing. But at the minimum, most in the community would agree that a proper deck should have a non-traditional form factor, and be designed to meet the unique needs of the builder. If you’re looking for a fantastic example of both concepts, check out the Cyberdore 2064 from [Tommi L].

At first glance the 3D printed enclosure of the Cyberdore looks a bit like a Speak & Spell, but it’s really more of an amalgamation of everything that made 1980s computers so unique. You’ve got the vents, the chunky switches, the undersized display, and of course, the handle. The case might have been extruded in 2024, but it’s doing a fantastic impression of a piece of tech from 40 years ago.

One of the key external features of the Cyberdore 2064 is the side-mounted rotary encoder that allows for smoothly scrolling through online feeds (such as your favorite hardware hacking site) or long documents. The cheap and easy to work with KY-040 encoder has been converted to a USB input device by way of a Pi Pico, and has been paired with an over-sized 3D printed knob that really makes this build stand out — not only visually, but in terms of usability. These cyberdeck builds often rely on touch screens for input, but we always appreciate a physical interface.

Under the hood you’ve got a Raspberry Pi Zero and an 18650 cell to keep the whole thing running while on the go. Though the Zero is certainly showing its age compared to the more modern variants of the Pi, for a device like this, raw computing power isn’t really the driving concern. A mechanical keyboard usually rounds out these cyberdeck builds, but in this case, [Tommi] went with a fairly common Rii 518BT portable board that’s been skillfully integrated into the front of the Cyberdore.

All of the STL files necessary to print out your own Cyberdore 2064 are available on Printables, and while [Tommi] didn’t exactly provide build instructions, the write-up provides plenty of information to get you started.

So is it just us, or does looking at Cyberdore 2064 make you think it’s time for another Hackaday Cyberdeck Challenge?

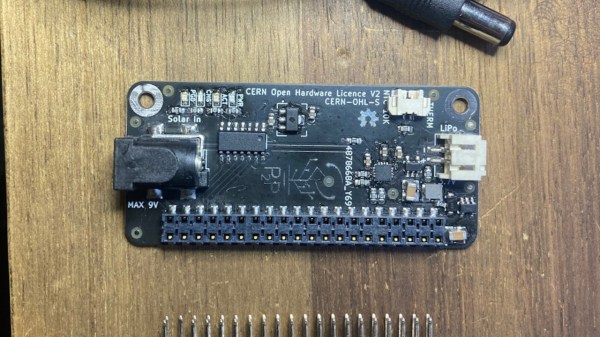
The PhotonPower Zero board laying on a desk surface

PhotonPower Zero For Effortless Solar Pi Zero Projects

A Pi Zero doesn’t need much to sustain itself, and it’s projects like the PhotonPower Zero that remind us of it its low appetite when we need this reminder most. The PhotonPower Zero board lets you power a Pi Zero board from a solar cell, with a LiIon backup, and a microcontroller for power management. Created by [David Murray], this board’s been a perfect solution for quite a few projects of his, and now he is sharing the design so that we can create outdoor-suited devices as easily as he’s been able to.

Tested for months in Australian summer and winter conditions alike, the design pulls no punches and has everything you might need. Like any self-respecting power addon, it has a management microcontroller for going as low-power as you’d like, communicating the battery data to the Pi Zero, and being able to safely shut it down when needed. If you fancy what this board does, [David Murray] tells you all, both in the video and in the associated posts!

One of the best parts about this board is that it’s fully open-source – schematics, KiCad PCB source files, and even 3D designs are available in the GitHub repo. You could source all the parts right now and build a fleet of solar-powered Zeros, and if you want the hard parts to be done for you, there’s a Kickstarter campaign that lets you get a PhotonPower Zero board without self-assembly. We’ve covered similar boards before – powering a Pi Zero isn’t lost art, and, there’s a lot to learn from this project specifically. Such boards are especially tempting, given that the latest Pi Zero W 2 is the most efficient Pi Zero to date – outdoor-capable 24/7 powered devices with a fair bit of CPU have never been this close!

Continue reading “PhotonPower Zero For Effortless Solar Pi Zero Projects”

AI-Powered Bumper Sticker Provides Context-Sensitive Urban Camouflage

While we absolutely support the right of everyone to express their opinions, it seems to us that it’s rarely wise to turn your vehicle into a mobile billboard for your positions. Aside from potentially messing up the finish on your car, what’s popular and acceptable at home might attract unwanted attention while traveling abroad, leading to confrontations that might make your trip a little more eventful than it needs to be.

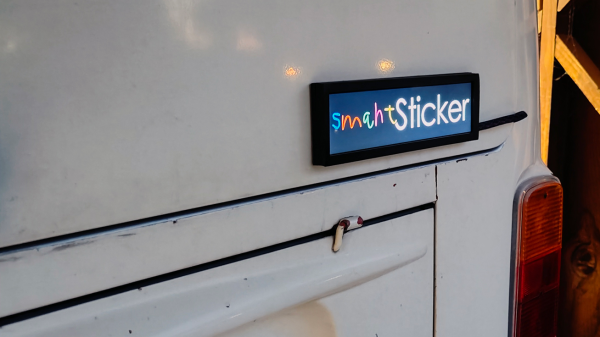
So why not let technology help you speak your mind in a locally sensitive manner? That’s the idea behind [Pegor]’s “smahtSticker”, an AI-powered bumper sticker that provides the ultimate in context-sensitive urban camouflage. The business end of smahtSticker — we’re going to go out on a limb here and predict that [Pegor] hails from the Boston area — is an 8.8″ (22-cm) wide HDMI display capable of 1920×480 resolution. That goes on the back of your car and is driven by a Raspberry Pi Zero with a GPS module. The Pi grabs a geolocation every second, and if you’ve moved more than 25 feet (7.6 m) — political divisions are at least that granular in the US right now, trust us — it grabs your current ZIP code using GeoPy. That initiates a query to the OpenAI API to determine the current political attitudes in your location, which is used to select the right slogan to display. You’ll fit in no matter where you wander — wicked smaht!

Now, of course, this is all in good fun, and with tongue planted firmly in cheek. The display isn’t weatherized at all, so that would need to be addressed if one felt like fielding this. Also, ZIP codes may be good for a lot of things, but it’s not the best proxy for political alignment, so you might want to touch that part up.

Illustrated Kristina with an IBM Model M keyboard floating between her hands.

Keebin’ With Kristina: The One With The Really Snazzy Folding Keyboard

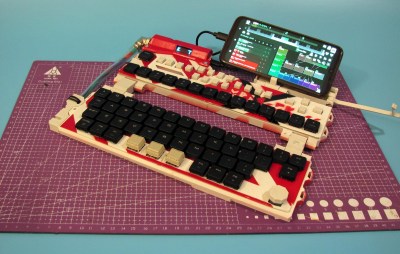
Sometimes you just have to throw your hat in the ring, and throw it hard. Here is [mkdxdx]’s rockin’ EVH 5150-esque take on the keyboard business. The Mriya foldable keyboard aims to be and sport a number of things, and it does all of them in great style. I could totally see my fingers flying over this thing somewhere in the wild, with robots fighting in the distance.

Image by [mkdxdx] via Hackaday.IO
I have to say I really like the fact that [mkdxdx] uses thumb keys here for what I can only assume are Enter, Space, and Backspace. It’s a nice compromise between compactness and ergonomics. I also really like the totally impractical but quite cool-looking connector that runs between the top and bottom.

If the color scheme looks familiar, you’re probably remembering [mkdxdx]’s first-place-winning entry into the 2023 Cyberdeck Contest. This RP2040-based keyboard might just end up as part of a larger project, but it’s already an outstanding peripheral. We can’t wait to see the next phase, should there be one for this keyboard.

Continue reading “Keebin’ With Kristina: The One With The Really Snazzy Folding Keyboard”

Raspberry Pi Zero Powers Custom Camera Platform

These days, most of us are carrying a fairly impressive digital camera with us at all times. But as capable as the hardware and software of a modern smartphone may be, there’s still plenty of reasons you may want a “real” camera to go along with it. The larger sensor, advanced controls, and selection of lenses that you’ll get with even a relatively cheap camera opens up a world of artistic possibilities.

If you’re really into chasing that perfect shot, you can even build your own digital camera these days. This design from [Jacob Cunningham] may not be able to go shot-for-shot against a Canon or Nikon in its current state, but we think you’ll agree there’s a lot of potential here — especially for something pieced together with modular components and perfboard.

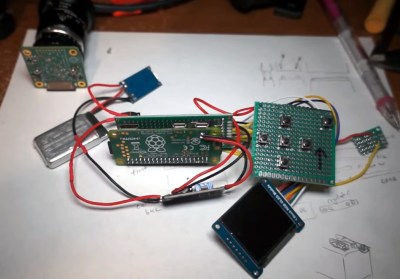
Inside the 3D printed enclosure is a Raspberry Pi Zero, a Pi HQ Camera module, an 1.5″ OLED display, a lithium-ion battery pouch cell, and the charging and voltage regulation boards necessary to keep everything powered up. There’s also a handful of tactile buttons to work through the settings and menus, and a 10-axis IMU to help you keep your horizon level.

[Jacob] figures the whole thing comes in at around at $185.00, though naturally that number could go up or down considerably depending on what you’ve already got in the parts bin and what kind of lenses you add to the mix.

The hardware side of things looks more or less complete, at least for a first version, and [Jacob] has provided everything you’ll need to build one of your own. But the software is still a work in progress, with the latest push to the Python code in the project’s GitHub repository just eight hours old at the time of this writing. If you’ve been looking for a DIY camera project to really sink your teeth into, this could provide a great starting point.

If you’re more interested in moving pictures, we recently covered the CinePi project, which aims to develop an open source cinema-quality camera that you won’t need studio backing to afford.

Continue reading “Raspberry Pi Zero Powers Custom Camera Platform”

Blackberry Pi Puts Desktop Linux In Your Pocket

Let’s face it — Android wasn’t what most of us had in mind when we imagined having Linux running on our phones. While there’s a (relatively) familiar kernel hiding at the core of Google’s mobile operating system, the rest of the environment is alien enough that you can’t run Linux software on it without jumping through some hoops. While that’s fine for most folks, there remains a sizable group of users who still dream of a mobile device that can run a full Linux operating system without any compromises.

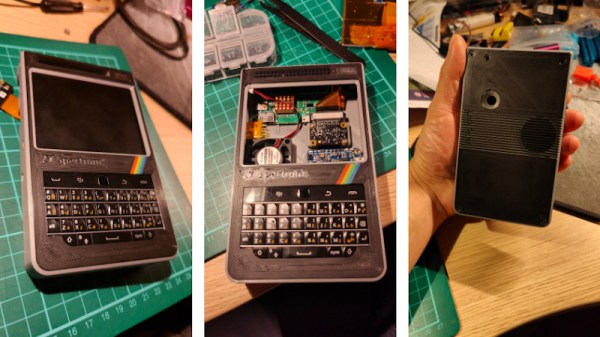
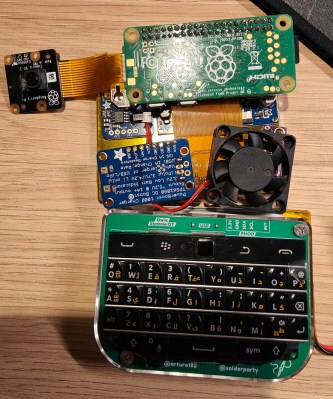
Judging by the work put into the Blackberry Pi, we’re willing to bet that [IMBalENce] falls into that camp. The custom handheld combines the Raspberry Pi Zero, a 320×240 LCD, and the BBQ20KBD keyboard from Solder Party with a 2500 mAh LiPo pouch cell and associated charging circuitry. Optionally, it also supports modules such as the Raspberry Pi Camera, a Real-Time-Clock, a ADS1015 ADC to read the battery voltage, and even a USB hub — although you can’t have all the goodies installed at once as it draws too much current.

Everything is packed into a 3D printed case that looks roughly like an original DMG-01 Game Boy if somebody replaced the bottom half with a tiny keyboard. We appreciate the ZX Spectrum theme, even if it’s not immediately clear how it relates to the project other than being an excuse to play around with multi-color printing. [IMBalENce] says the final product works quite well, though the relatively limited keys on the BlackBerry keyboard does make it tricky to use the device for writing code.

Interested in mobile Linux, but not trying to build the hardware yourself? We recently took a look at the SQFMI Beepy, which is fairly similar in terms of hardware, but very much in need of some talented penguin wranglers who are willing to come in and work on the software and documentation. Think you’re up for the challenge?