Donated Atari Mega ST Gives A Peek At Game Development History

[Neil] from The Cave, a computer and console gaming museum in the UK, has a treat for vintage computing and computer gaming enthusiasts. They received an important piece of game dev history from [Richard Costello], who coded ports of Gauntlet 2, Mortal Kombat, and Primal Rage for Atari ST and Amiga home computers. [Richard] brought them his non-functional Atari Mega ST in the hopes that they could get it working again, and demonstrate to visitors how game development was done back in the 80s — but sadly the hardware is not in the best shape.
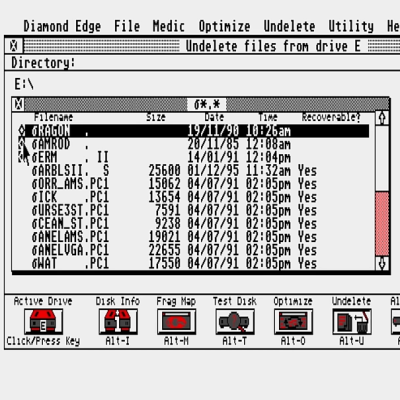
The Atari ST flagged deleted files for overwriting but didn’t actively wipe them, allowing an undelete utility to work.

That doesn’t stop [Neil], however. The real goal is seeing if it’s possible to re-create the development environment and access the game assets on the SCSI hard drive, and it’s not necessary to revive every part of the hardware to do that. The solution is to back up the drive using a BlueSCSI board which can act as a host, scan the SCSI bus, and dump any device it finds to an SD card. The drive didn’t spin up originally, but some light percussive maintenance solved that.

With the files pulled off the drive, it was time to boot it up using an emulator (which begins at the 16:12 mark). There are multiple partitions, but not a lot of files. There was one more trick up [Neil]’s sleeve. Suspecting that deleting everything was the last thing [Richard] did before turning the machine off decades ago, he fired up a file recovery utility. The Atari ST “deleted” files by marking them to be overwritten by replacing the first letter of the filename with a ‘bomb’ character but otherwise leaving contents intact. Lo and behold, directories and files were available to be undeleted!

[Neil] found some fascinating stuff such as mixed game and concept assets as well as what appears to be a copy of Ramrod, a never-released game. It’s an ongoing process, but with any luck, the tools and environment a game developer used in the 80s will be made available for visitors to experience.

Of course, modern retro gaming enthusiasts don’t need to create games the classic way; tools like GB Studio make development much easier. And speaking of hidden cleverness in old games, did you know the original DOOM actually had multi-monitor support hidden under the hood?

Continue reading “Donated Atari Mega ST Gives A Peek At Game Development History”

Braun TS2 Radio Turns 68, Gets Makeover

The Braun TS2 radio was a state-of-the art tube set in 1956. Today it still looks great, but unsurprisingly, the one that [Manuel Caldeier] has needed a little tender loving care. The table radio had a distinct style for its day and push-buttons. However, the dial glass and the speaker grill needed replacement. Even more interesting, the radio has a troublesome selenium rectifier, giving him the perfect chance to try out his new selenium rectifier solid-state replacement.

The radio is as good-looking inside as it is outside. You can tell that this isn’t his first restoration, as he has several tricks to test things at different stages of the project.

While the radio looked good, it smelled of smoke, which required a big effort to clean. The dial glass was intact enough for him to duplicate it in a graphic program and print it on a transparent adhesive sticker. With a deep breath, he removed the original markings from the glass so he could add the sticker to it. That didn’t work because the label needed cutouts. So now he is waiting for a piece of acrylic that will have the art UV printed on it.

We want to see the next part as we imagine the radio sounds as good as it looks when it is working. If you want to know more about the rectifier replacement, we covered that earlier. Even years later, Braun would have a clean aesthetic.

Continue reading “Braun TS2 Radio Turns 68, Gets Makeover”

Curing CRT Cataracts Freshens Up Retro Roundy TVs

It’s been a long time since the family TV has had a CRT in it, and even longer since that it was using what was basically an overgrown oscilloscope tube. But “roundies” were once a thing, and even back in the early 80s you’d still find them in living rooms on TV repair calls, usually sporting a characteristic and unsightly bullseye discoloration.

Fast-forward a few decades, and roundy TVs have become collectible enough that curing their CRT cataracts is necessary for restorationists like [shango066], a skill he demonstrates in the video below. The defect comes from the composite construction of CRTs — a safety feature added by television manufacturers wisely concerned with the safety aspects of putting a particle accelerator with the twin hazards of high vacuum and high voltage in the family home. The phosphor-covered face of the tube was covered by a secondary glass cover, often tinted and frosted to improve the admittedly marginal viewing experience. This cover was often glued in place with an epoxy resin that eventually oxidized from the edges in, making the bullseye pattern.

The remedy for this problem? According to [shango066], it’s heat, and plenty of it. After liberating the tube from the remarkably clean TV chassis, he took advantage of a warm summer’s day and got the tube face cooking under a black plastic wrap. Once things were warmed up, more heat was added to really soften the glue; you can easily see the softening progress across the face of the tube in the video below. Once softened, gentle prying with wooden chopsticks completes the job of freeing the safety lens, also in remarkably good shape.

With the adhesive peeled off in an oddly satisfying manner, all that’s left is a thorough cleaning and gluing the lens back on with a little silicone sealant around the edges. We’d love to see the restored TV in operation, but that’s left to a promised future video. In the meantime, please enjoy a look at the retro necessities TV owners depended on in the good old days, which really weren’t all that good when you get down to it.

Continue reading “Curing CRT Cataracts Freshens Up Retro Roundy TVs”

Steel Reinforcement Toughens Cracked Vintage Knobs

Nothing can ruin a restoration project faster than broken knobs. Sure, that old “boat anchor” ham rig will work just fine with some modern knobs, but few and far between are the vintage electronics buffs that will settle for such aesthetic affrontery. But with new old stock knobs commanding dear prices, what’s the budget-conscious restorationist to do? Why, fix the cracked knobs yourself, of course.

At least that’s what [Level UP EE Lab] tried with his vintage Heahkit DX60 ham transmitter, with pretty impressive results. The knobs on this early-60s radio had all cracked thanks to years of over-tightening the set screws. To strengthen the knobs, he found some shaft collars with a 1/4″ inside diameter and an appropriate set screw. The backside of the knob was milled out to make room for the insert, which was then glued firmly in place with everyone’s go-to adhesive, JB Weld. [Level UP] chose the “Plastibonder” product, which turns out not to be an epoxy but rather a two-part urethane resin, which despite some initial difficulties flowed nicely around the shaft collar and filled the milled-out space inside the knob. The resin also flowed into the channels milled into the outside diameter of the shaft collars, which are intended to grip the hardened resin better and prevent future knob spinning.

It’s a pretty straightforward repair if a bit fussy, but the result is knobs that perfectly match the radio and still have the patina of 60-plus years of use. We’ll keep this technique in mind for our next restoration, or even just an everyday repair. Of course, for less demanding applications, there are always 3D printed knobs.

Continue reading “Steel Reinforcement Toughens Cracked Vintage Knobs”

For years, the first Air Force One sat neglected and forgotten in an open field at Arizona’s Marana Regional Airport. (Credit: Dynamic Aviation)

The First Air Force One And How It Was Nearly Lost Forever

Although the designation ‘Air Force One’ is now commonly known to refer to the airplane used by the President of the United States, it wasn’t until Eisenhower that the US President would make significant use of a dedicated airplane. He would have a Lockheed VC-121A kitted out to act as his office as commander-in-chief. Called the Columbine II after the Colorado columbine flower, it served a crucial role during the Korean War and would result the coining of the ‘Air Force One’ designation following a near-disaster in 1954.

This involved a mix-up between Eastern Air Lines 8610 and Air Force 8610 (the VC-121A). After the Columbine II was replaced with a VC-121E model (Columbine III), the Columbine II was mistakenly sold to a private owner, and got pretty close to being scrapped.

In 2016, the plane made a “somewhat scary and extremely precarious” 2,000-plus-mile journey to Bridgewater, Virginia, to undergo a complete restoration. (Credit: Dynamic Aviation)

Although nobody is really sure how this mistake happened, it resulted in the private owner stripping the airplane for parts to keep other Lockheed C-121s and compatible airplanes flying. Shortly before scrapping the airplane, he received a call from the Smithsonian Institution, informing him that this particular airplane was Eisenhower’s first presidential airplane and the first ever Air Force One. This led to him instead fixing up the airplane and trying to sell it off. Ultimately the CEO of the airplane maintenance company Dynamic Aviation, [Karl D. Stoltzfus] bought the partially restored airplane after it had spent another few years baking in the unrelenting sun.

Although in a sorry state at this point, [Stoltzfus] put a team led by mechanic [Brian Miklos] to work who got the airplane in a flying condition by 2016 after a year of work, so that they could fly the airplane over to Dynamic Aviation facilities for a complete restoration. At this point the ‘nuts and bolts’ restoration is mostly complete after a lot of improvisation and manufacturing of parts for the 80 year old airplane, with restoration of the Eisenhower-era interior and exterior now in progress. This should take another few years and another $12 million or so, but would result in a fully restored and flight-worthy Columbine II, exactly as it would have looked in 1953, plus a few modern-day safety upgrades.

Although [Stoltzfus] recently passed away unexpectedly before being able to see the final result, his legacy will live on in the restored airplane, which will after so many years be able to meet up again with the Columbine III, which is on display at the National Museum of the USAF.

George Washington Gets Cleaned Up With A Laser

Now, we wouldn’t necessarily call ourselves connoisseurs of fine art here at Hackaday. But we do enjoy watching [Julian Baumgartner]’s YouTube channel, where he documents the projects that he takes on as a professional conservator. Folks send in their dirty or damaged paintings, [Julian] works his magic, and the end result often looks like a completely different piece. Spoilers: if you’ve ever looked at an old painting and wondered why the artist made it so dark and dreary — it probably just needs to be cleaned.

Anyway, in his most recent video, [Julian] pulled out a piece of gear that we didn’t expect to see unleashed against a painting of one of America’s Founding Fathers: a Er:YAG laser. Even better, instead of some fancy-pants fine art restoration laser, he apparently picked up second hand unit designed for cosmetic applications. The model appears to be a Laserscope Venus from the early 2000s, which goes for about $5K these days.

Now, to explain why he raided an esthetician’s closet to fix up this particular painting, we’ve got to rewind a bit. As we’ve learned from [Julian]’s previous videos, the problem with an old dirty painting is rarely the paining itself, it’s the varnish that has been applied to it. These varnishes, especially older ones, have a tendency to yellow and crack with age. Now stack a few decades worth of smoke and dirt on top of it, and you’ve all but completely obscured the original painting underneath. But there’s good news — if you know what you’re doing, you can remove the varnish without damaging the painting itself.

In most cases, this can be done with various solvents that [Julian] mixes up after testing them out on some inconspicuous corner of the painting. But in this particular case, the varnish wasn’t reacting well to anything in his inventory. Even his weakest solvents were going right through it and damaging the paint underneath.

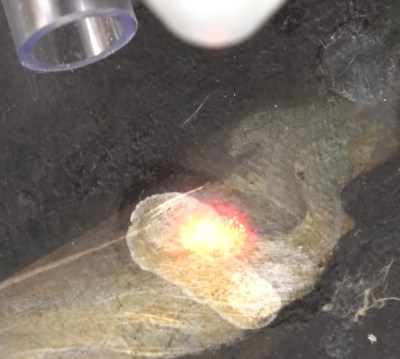
Because of this, [Julian] had to break out the big guns. After experimenting with the power level and pulse duration of the 2940 nm laser, he found the settings necessary to break down the varnish while stopping short of cooking the paint it was covering. After hitting it with a few pulses, he could then come in with a cotton swab and wipe the residue away. It was still slow going, but it turns out most things are in the art conservation world.

This isn’t the first time we’ve covered [Julian]’s resourceful conservation methods. Back in 2019, we took at look the surprisingly in-depth video he created about the design and construction of his custom heat table for flattening out large canvases.

Continue reading “George Washington Gets Cleaned Up With A Laser”

Taking A Look Underneath The Battleship New Jersey

By the time you read this the Iowa-class battleship USS New Jersey (BB-62) should be making its way along the Delaware River, heading back to its permanent mooring on the Camden waterfront after undergoing a twelve week maintenance and repair period at the nearby Philadelphia Navy Yard.

The 888 foot (270 meter) long ship won’t be running under its own power, but even under tow, it’s not often that you get to see one of the world’s last remaining battleships on the move. The New Jersey’s return home will be a day of celebration, with onlookers lining the banks of the Delaware, news helicopters in the air, and dignitaries and veterans waiting eagerly to greet her as she slides up to the pier.

But when I got the opportunity to tour the New Jersey a couple weeks ago and get a first-hand look at the incredible preservation work being done on this historic ship, it was a very different scene. There was plenty of activity within the cavernous Dry Dock #3 at the Navy Yard, the very same slip where the ship’s construction was completed back in 1942, but little fanfare. Staff from North Atlantic Ship Repair, the company that now operates the facility, were laboring feverishly over the weekend to get the ship ready.

While by no means an exhaustive account of the work that was done on the ship during its time in Dry Dock #3, this article will highlight some of the more interesting projects that were undertaken while it was out of the water. After seeing the thought and effort put into every aspect of the ship’s preservation by curator Ryan Szimanski and his team, there’s no doubt that not only is the USS New Jersey in exceptionally capable hands, but that it will continue to proudly serve as a museum and memorial for decades to come.

Continue reading “Taking A Look Underneath The Battleship New Jersey